
 |
ROLEXROLEXROLEXROLEXROLEXROLEX
 ROLEXROLEXROLEXROLEXROLEXROLEX
|
|
#1 |
|
"TRF" Member
Join Date: Sep 2008
Location: SoCal
Watch: Rolex
Posts: 1,308
|
I polished my SD...here are the results!
So, I've had this F serial SD for about a month or two...I bought it pre-owned. My first Rolex, and I couldn't be more pleased. Overall, it was in good condition but had typical swirlies associated with a couple years of everyday use. In addition, there were several minor blemishes on the 5 o'clock lug. Again not a big deal and those will be addressed by the RSC when it goes in for service. But I figured I'd take care of the swirlies with my trusty dremel.
Now I've read several threads on this and other forums saying you'd have to be crazy to go near your watch with a dremel. While I can see the concern, if you've had some experience polishing metal with a dremel, it can be a very useful tool in keeping your piece polished in between servicing. The main concern is heat, you DO NOT want to build up heat between the polishing wheel and the surface of the case as that's when 'bruising' can happen and you can discolor the steel a bit. As long as you keep this in mind, you'll be find. Now I must say, if you're not familiar with using a dremel or power tools, this probably isn't for you. For those of you who are somewhat confident when it comes to handling tools, this is a simple task that can be performed in under 30 minutes. So lets get started...I'm not the best photographer, but please bear with me. Here are some pics of the 'swirlies' I'm talking about. They're nothing major, but can take away from the 'pop' your Rolex has when the light hits it...you know what I mean. 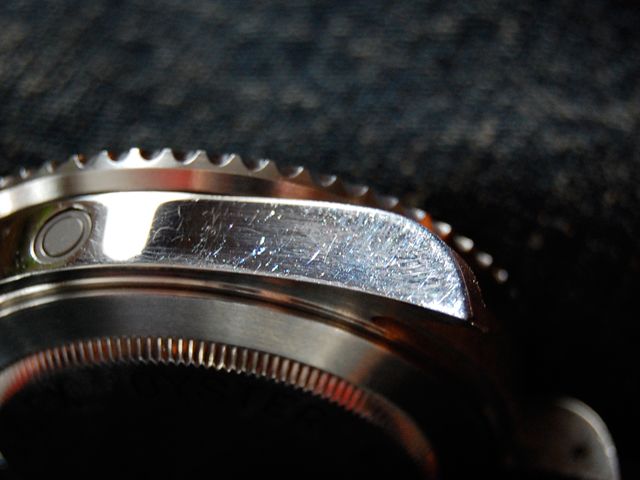 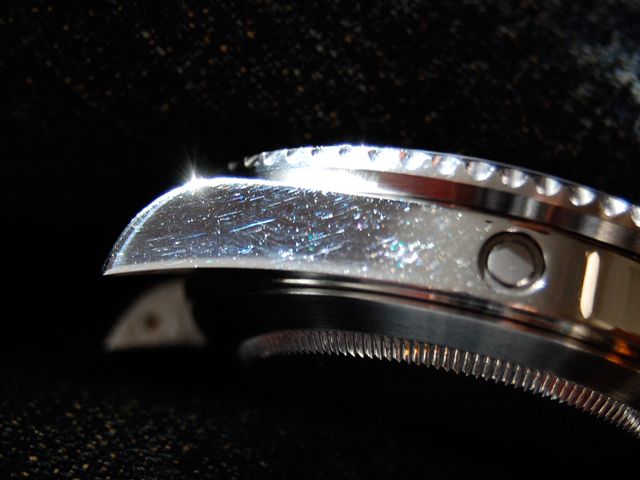 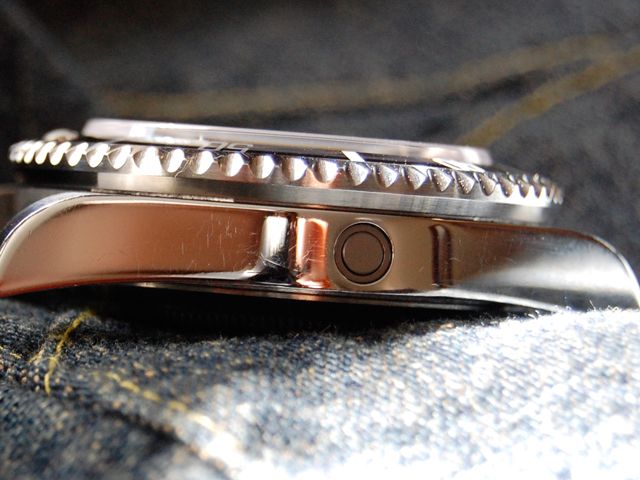  Here is the tool set I'll be working with. I'm really only going to use 2 polishing pads from this set, but if I were to just buy the two pads, I'm already over 1/2 of the cost for the set...so I figured what the heck.  So here is my work area. You see the pads, the watch & bracelet, and my green jeweler's rouge. The stuff in the jar is dremel polish and I didn't use it...not sure why it's in the picture. The green rouge though is quite common and that big bar cost me around $12. 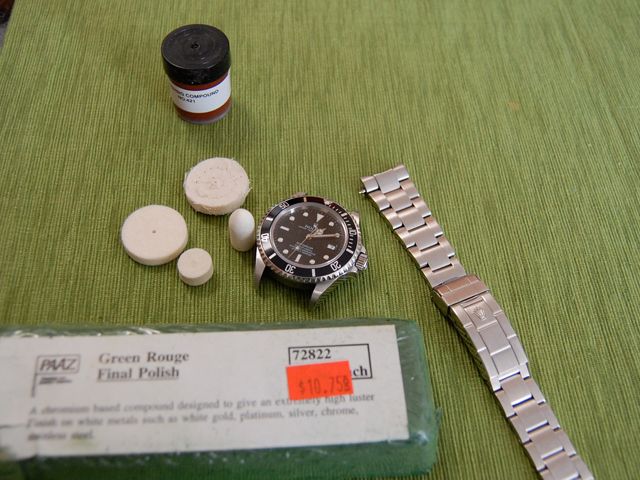 So lets get some rouge on the polishing wheel...just turn the dremel on and rub it up against the rouge. Be sure to where eye protection though...getting rouge in the eye is NOT fun... :( 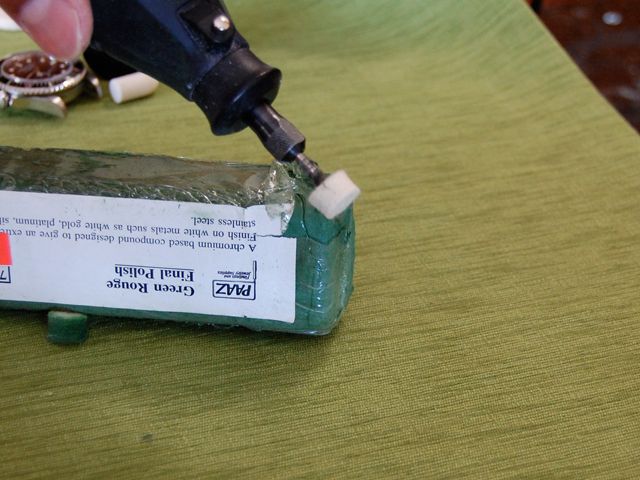 So your wheel should look like this after it's rouged up.  Keeping the dremel on the lowest setting, you just want to gently rub the sides of the case in an even motion...you do not need to apply mush pressure at all...in fact, less is better. What you want to be careful of here is heat build up. You want to polish for increments of 30 seconds or so, constantly feeling the case to see if it's warm or hot. If it is, stop...you do not want to build up heat because that will result in discoloring. You'd really have to grind in there for a while to do any real damage but lets just not go there...this is a 'lite' polish we're doing here. 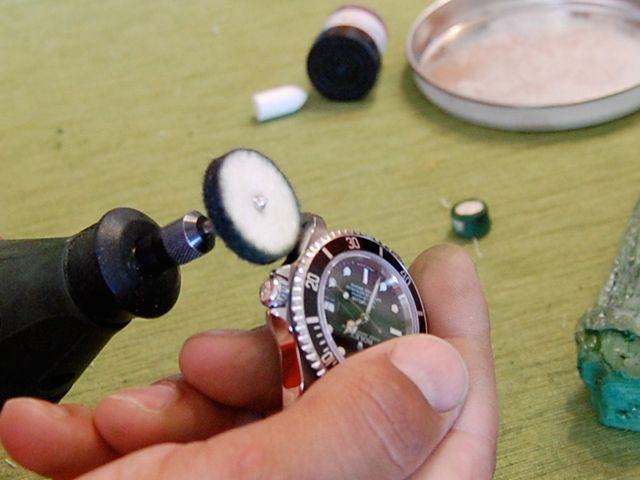 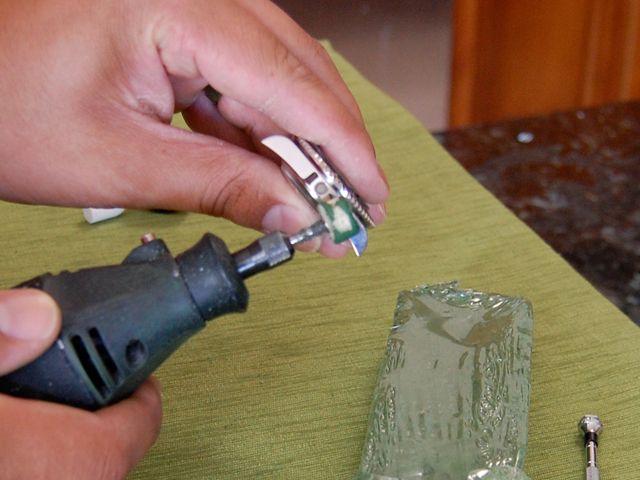 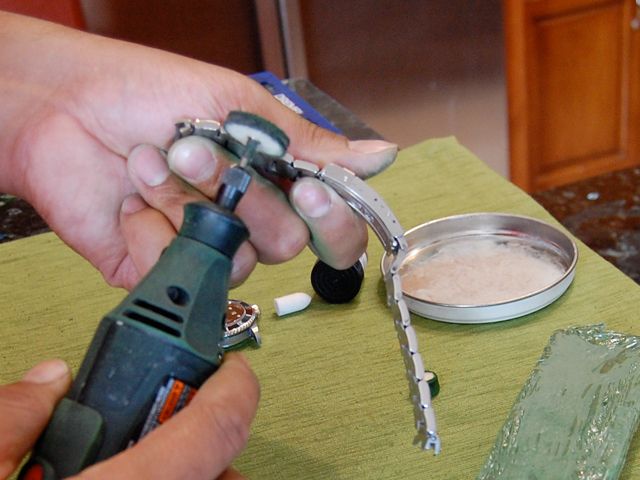 So, after working the sides of the case for a minute or two, you'll want to give it a good wipe down with a cape cod cloth...just to remove any rouge that's left over and to give it a good buffing. 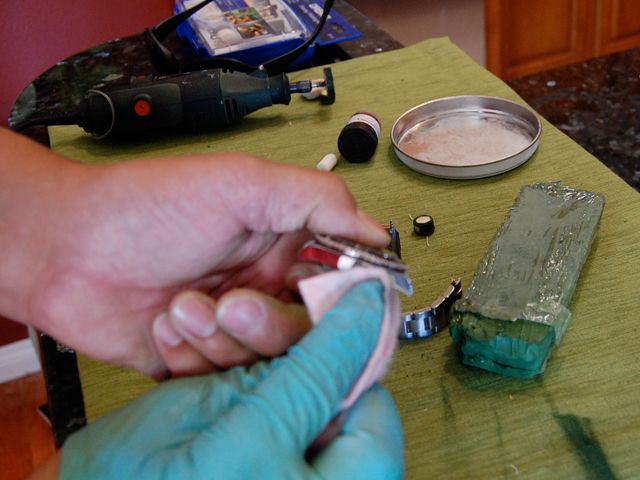 Now for the bracelet. If you've got desk diving scratches, and I know you do...they can be removed in less than a minute with the lite brush down from a scotch brite pad. This is probably the easiest service you can give your brushed bracelet...and it works magic every time. Just gently rub in the same direction of the brushed texture of the bracelet. This is what it looked like before...    And here are some pics after all said above has been done...       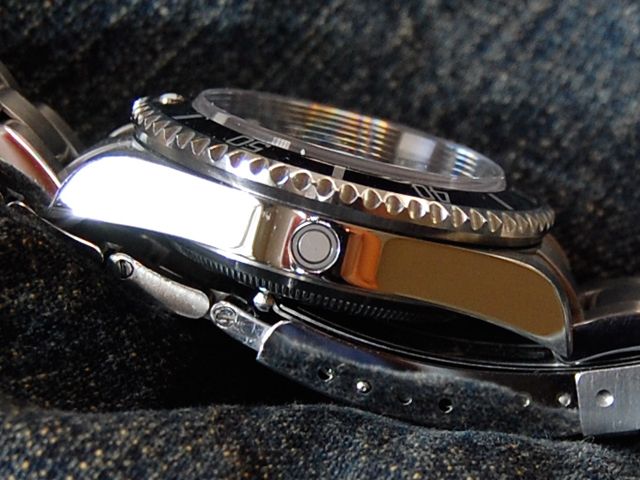 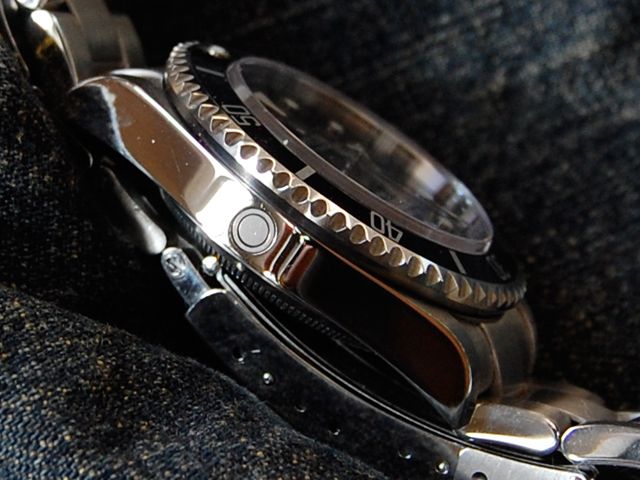 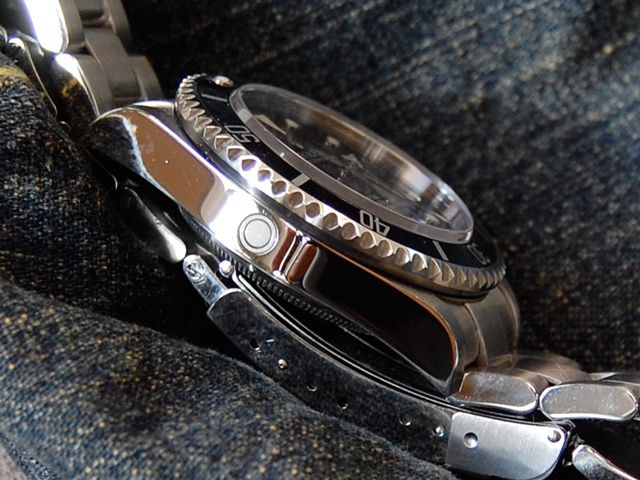 Again, I'm not the best photographer, but I'm very pleased with the results. I didn't remove enough metal to get out the blemishes...which is fine because I don't want to...that's getting into risky territory but the swirlies are no more and my watch looks great. Hope this helps. |
|
|

|
|
|
#2 |
|
"TRF" Member
Join Date: Jun 2008
Location: Canada
Watch: Air-King 114200
Posts: 2,878
|
seems like a losing battle to me, but to each their own.
|
|
|

|
|
|
#3 |
|
2024 SubLV41 Pledge Member
Join Date: Sep 2008
Location: North Florida
Posts: 16,719
|
Great job!!!
|
|
|

|
|
|
#4 |
|
"TRF" Member
Join Date: Oct 2008
Real Name: Andy
Location: Kuala Lumpur, MY
Watch: Me Watching You!!
Posts: 3,260
|
Nicely done!
|
|
|

|
|
|
#5 |
|
"TRF" Member
Join Date: Jul 2008
Location: TEXAS
Watch: ROLEX LV
Posts: 156
|
Thats a great job
  
__________________
GMT MASTER IIC 116710 M GMT MASTER ll 16710 M SUBMARINER 16610 LV M SUBMARINER 16613 M |
|
|

|
|
|
#6 |
|
"TRF" Member
Join Date: Oct 2007
Real Name: Dennis
Location: Bay Area - 925
Posts: 40,018
|
Wow, great post ! I'm going to go out and buy a Dremel Kit and try this ! My SD and my Explorer 1 need some polishing. Thanks !!!
__________________
TRF Member #6699 (since September 2007) |
|
|

|
|
|
#7 |
|
⭐⭐⭐⭐⭐⭐
2024 SubLV41 Sponsor & Boutique Seller Join Date: Sep 2008
Real Name: Oscar
Location: Florida
Watch: Me!!!
Posts: 23,233
|
very nice....!!! makes your SD more unique!!
__________________

|
|
|

|
|
|
#8 |
|
2024 SubLV41 Pledge Member
Join Date: Sep 2008
Location: USA
Posts: 9,207
|
Wow, excellent job!
|
|
|

|
|
|
#9 |
|
"TRF" Member
Join Date: Jul 2007
Real Name: Mike
Location: Virginia, US
Watch: SD 16600
Posts: 4,319
|
Nice job!
__________________
The fool, with all his other faults, has this also - he is always getting ready to live. - Epicurus (341–270 BC) |
|
|

|
|
|
#10 |
|
2024 SubLV41 Pledge Member
Join Date: Sep 2008
Real Name: Fred
Location: KY, USA
Watch: GMT-Master II
Posts: 10,042
|
sdwtchlvr,
that is a great and detailed report. Nice pictures also. Thanks for sharing!
__________________
Member # 16057 4-Hands Club Tosser Club Member TRF Skypers Group |
|
|

|
|
|
#11 |
|
"TRF" Member
Join Date: Aug 2007
Location: amk
Posts: 792
|
Great skill!
|
|
|

|
|
|
#12 |
|
Member
Join Date: Oct 2008
Location: Good ol' USA
Watch: DATEJUST (116200)
Posts: 161
|
Wow... both impressive and... gutsy! Great-looking job!
|
|
|

|
|
|
#13 |
|
2024 SubLV41 Pledge Member
Join Date: Sep 2008
Location: New Mexico
Watch: Seiko #SRK050
Posts: 34,454
|
Good work!
__________________
JJ Inaugural TRF $50 Watch Challenge Winner |
|
|

|
|
|
#14 |
|
Member
Join Date: Oct 2008
Real Name: Chuck Norris
Location: So. California
Watch: SS Daytona w/ dial
Posts: 346
|
So wait, you used a that green thing that woman use when scrubbing toilets to polish the link( or remove the scratches? If so I want to do it now.
|
|
|

|
|
|
#15 |
|
2024 SubLV41 Pledge Member
Join Date: Nov 2006
Real Name: Eddie
Location: Australia
Watch: A few.
Posts: 37,510
|
Good work.
Did you polish over the He valve?
__________________
E 
|
|
|

|
|
|
#16 |
|
Member
Join Date: Oct 2008
Real Name: Chuck Norris
Location: So. California
Watch: SS Daytona w/ dial
Posts: 346
|
Omfg, I just tried the green thing to polish the links and did exactly what you said and keep doing it in the same direction and my watch looks like new. I CANNOT BELIEVE 5 years of bumbing into crap and little cosmetic scratches are gone.
COMPLETELY GONE!! Thank you. |
|
|

|
|
|
#17 |
|
"TRF" Member
Join Date: Sep 2008
Real Name: Boyd
Location: NC
Posts: 1,815
|
Most excellent
 Thanks Thanks
__________________
16610M 16710Z Pepsi 16570V White |
|
|

|
|
|
#18 | |
|
"TRF" Member
Join Date: Sep 2008
Location: SoCal
Watch: Rolex
Posts: 1,308
|
Quote:
|
|
|
|

|
|
|
#19 |
|
"TRF" Member
Join Date: Sep 2008
Location: SoCal
Watch: Rolex
Posts: 1,308
|
Oh yeah, and I avoided the HEV valve...just didn't go over that area...super easy to avoid.
|
|
|

|
|
|
#20 |
|
2024 SubLV41 Pledge Member
Join Date: Dec 2007
Real Name: Peter
Location: Sydney
Watch: The Game
Posts: 17,415
|
Good job

|
|
|

|
|
|
#21 |
|
2024 Pledge Member
Join Date: Sep 2008
Real Name: Richard
Location: USA
Watch: YM Deep Space
Posts: 12,521
|
Great writeup. This needs to be put permanently under the Reference Library!
__________________
Rolex Yacht-Master 40mm (SS-YG / Deep Space MOP) 16623 Breitling Aerospace Titanium / 18K with UTC. Omega Speedmaster 3510.50 Oris TT1 Pro Diver Regulator 43MM |
|
|

|
|
|
#22 |
|
"TRF" Member
Join Date: Nov 2008
Real Name: Yannis
Location: Europe
Watch: maniac
Posts: 9,070
|
This is an ace job done to the watch!! Congratulations man! And thanks for the useful info!!
|
|
|

|
|
|
#23 |
|
"TRF" Member
Join Date: Aug 2006
Real Name: Scott
Location: GMT -7
Watch: GMT's & Sub's
Posts: 10,401
|
Looks good, but IMO you are fighting a losing battle. The long term effects is that your case will appear over polished, but I applaud your efforts, it not everyone who takes a $50 power tool to a $6K watch!
~Scott
__________________
"The bitterness of poor quality remains long after the sweetness of lower price is forgotten." -Benjamin Franklin Member No. 922 |
|
|

|
|
|
#24 |
|
2024 Pledge Member
Join Date: Sep 2008
Real Name: Richard
Location: USA
Watch: YM Deep Space
Posts: 12,521
|
It looks like you are using two different wheels for polishing. Did you use the cotton wheel or were they both the felt wheels?
__________________
Rolex Yacht-Master 40mm (SS-YG / Deep Space MOP) 16623 Breitling Aerospace Titanium / 18K with UTC. Omega Speedmaster 3510.50 Oris TT1 Pro Diver Regulator 43MM |
|
|

|
|
|
#25 |
|
"TRF" Member
Join Date: Aug 2006
Location: Peterborough
Posts: 9,631
|
Great tutorial, thanks for taking the time to share
 
|
|
|

|
|
|
#26 |
|
"TRF" Member
Join Date: Sep 2008
Location: SoCal
Watch: Rolex
Posts: 1,308
|
So little of the metal is removed in the couple of minutes of light polishing with the dremel, it's really not as abrasive as it sounds. Granted, I've a bit of experience with the dremel...I wouldn't recommend this to anyone who is unfamiliar with a high RPM rotary tool.
My intention was simply to remove the superficial light swirlies on the sides of the case. There are some slightly deeper hairlines that didn't come out in the couple of minutes of polishing...which is fine...that's how I gauge removed. I would never do anything to risk damaging my watch...if I wasn't comfortable with the process I wouldn't do it. To answer the question above, I used the felt wheels for polishing but didn't really use the cotton wheel this time...used the cape cods instead. |
|
|

|
|
|
#27 |
|
Banned
Join Date: Mar 2008
Real Name: Michael
Location: LaLa Land
Watch: Sub Date 16610
Posts: 1,757
|
Good one.... I like the method..... :-) Thanx
|
|
|

|
|
|
#28 |
|
2024 Pledge Member
Join Date: Jun 2008
Location: So Cal, USA
Watch: Not a ONEWatch Man
Posts: 7,383
|
wow, excellent result

__________________
SS Submariner Date "Z" SS SeaDweller "D" SS Submariner "Random" TT Blue Submariner "P" SS GMT-Master ll "M", Pepsi Pam 311, 524, 297 |
|
|

|
|
|
#29 |
|
Banned
Join Date: Aug 2008
Location: Home!
Posts: 500
|
Great job
 . .
|
|
|

|
|
|
#30 |
|
"TRF" Member
Join Date: Feb 2008
Location: Houston, Tx.
Watch: 116660
Posts: 83
|
Nice job!
|
|
|

|
 |
| Currently Active Users Viewing This Thread: 1 (0 members and 1 guests) | |
|
|
*Banners
Of The Month*
This space is provided to horological resources.